
Looking for a backyard activity to enjoy with you family? Looking to boost your golf game? Learning how to install a backyard putting green can help!
Are you wanting to introduce some dynamic, yet low maintenance landscaping to your yard? Installing a backyard putting green can have far reaching affects beyond just improving your short game.
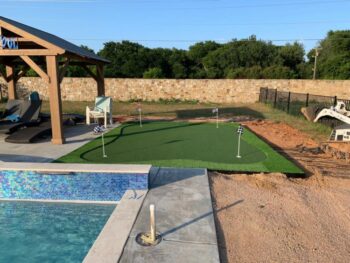
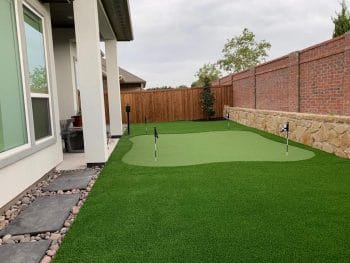
This is the DIY project you’ve been looking for. Installing a backyard putting green will have you improving all year round and your buddies struggling to catch up!
Not in the mood for a DIY project? Let Ryno Lawn Care design and install your backyard putting green with our superior synthetic turf.
Materials Needed
- paper and pencil
- tape measurer
- landscape fabric
- shovel
- landscape pins or turf pegs
- gravel
- crushed stone
- hand tamper
- level
- rolls of synthetic turf or rolls of fresh sod
- utility knife
Step 1
The first thing you want to do is pick a location and start to sketch out your green. PGA greens range from 5-6,000 sq ft.
1,000 sq ft is plenty of room for a home putting green. With a 1000 sq. ft green, you will still be able to incorporate several features to challenge yourself.
The ideal location will be a good distance from any structures and trees. Choose an area that is as close to level as possible.
You want the area to be unobstructed by a fence or building and the spot should have good drainage.
Use a tape measurer to make sure you have enough room. Or take the turf out and see where it fits best in your yard.
Step 2
There are a couple of ways to accomplish the second step. Essentially, what we are going for is a grass/weed/vegetation free zone for our putting green.
There are multiple ways to clear out the area. You can cover the area with landscape fabric until the present vegetation dies.
You can apply a long-term herbicide. Or simply outline the intended green area with spray paint and use a sod cutter to remove your grass.
Step 3
Excavate or dig out 3-5 inches of the dirt.
Lay out some landscape fabric over the bare dirt to prevent any vegetation from intruding on your base and obstructing the drainage you are going to establish.
Secure the fabric with landscape pins.
Step 4
Now is a good time to decide, where your cup is going and dig some trenches from the cup location outward, for drainage.
Fill your trenches with gravel and make sure to extend them beyond your green so that the water can drain completely out of the area.
Mark the locations for your cup(s) so that you can find them later. If your green is going to feature multiple features and more than one cup, this is going to be a crucial step.
Step 5
The excavated area will need to be filled with crushed stone, 1/4-3/8″ unwashed, crushed, limestone. You will need approximately 12 lbs of crushed stone per square foot. That will allow for a 2″ thick layer throughout your green.
This size of rock will provide the best base. It compacts well, no matter your method.
It will hold its shape over many years and it will drain well without hardening like concrete.
Sand, in comparison, will quickly become a problem because it will move down as you use the green. This happens even if you compact the sand.
Spread the stones with a rake or shovel. Then lightly moisten them with a hose and use the hand tamper to compact the stones.
This will allow you to establish a level, smooth, and flat base. Be careful around the cups. Try not to strike them.
Use a level to check that you’ve got a 3 ft radius around your cup(s). Make sure that they are smooth and flat.
This is important as it will help the ball roll properly, as it would on a professional course.
Step 5
As you near installing the turf, check that the manufacturer has sized the synthetic grass. If the manufacturer recommends so, roll the turf out.
Then, wet it with a hose until it’s saturated. After that, let it dry for 24 hours.
If you have to connect sections, always follow the manufacturer’s directions for cutting and joining sections.
Next, roll the synthetic turf out on top of your crushed rock base. Then use the utility knife to cut off any excess turf.
Step 6
Use landscape pins or turf pegs, ones that will rust to secure the putting green. That will allow for a stronger hold with your crushed base.
Your putting green should be about 2″ higher than the rest of your lawn. If you so desire, you can install a retaining wall or a chipping mat to protect your real grass.
Step 7
Some manufacturers recommend spreading sand over the turf and then sweeping the sand into the turf. It is supposed to help hold it in place.
Maintaining your turf is as simple as sweeping it and rinsing it off with the water hose. Although, it is best to consult with the manufacturer for specific cleaning and maintenance instructions.
Wrapping Up
To add some personality and creativity to your green, install a sand pit next to your new green.
For a more modern, unique putting green, you could install a rock garden surrounding your new green.
Complete the area with some patio furniture, a fire pit, or a path leading to the putting green. Installing creative hardscaping features is one of our landscaping specialities. Call Ryno Lawn Care today to find how we can help transform your outdoor space.
There’s no reason to automatically settle on using artificial turf. If you’re someone who enjoys lawn care, you could construct your putting green out of real grass.
Bermuda grass, creeping bentgrass or poa annua are the turfgrasses most often used for putting greens. Do you need fresh sod installed in your lawn? Get in touch with Ryno Lawn Care today to learn more about our sod installation service.
Don’t forget to add a little bit of your own unique creativity to this project. After all, if done properly, this can be a backyard fixture for as long as you own the house and could even help in resale value!